Thursday, September 30, 2010

Granny Apple Sauce


What a view! What a day! Its nearly October, it was 92 degrees, sunny, with a gentle breeze as I stood beneath the shade of apple tree in my flip flops for perhaps the last time this year. Last week one of my neighbors was very kind to invite me to their yard to help harvest the plenitude of apples that their trees were producing this year. I was very honored indeed especially after seeing how beautiful her apples were and the care and attention that she gives to her trees. The trees are about twenty years plus old.


These apple trees were obviously well established. They were full blown mature trees, with thick sturdy trunks. The trees were not too tall, which made picking easier. My neighbor even gave me a tour of the trees and did taste testing. Delicious!


One beauty of a tree in particular was a granny smith apple tree. Granny smith just happens to be my boyfriends favorite apple, so I was very excited that of all the trees this one in particular had by far the most apples on it.


Now in anticipation of my apple picking visit I thought I'd try my hand at making my own apple picker. Knowing the trees wouldn't be too tall I figured a ladder wouldn't be necessary if I had an apple picker. The night before picking, I did some research online of apple pickers and got the general gist of what was involved. The next morning my boyfriend suggested using my garden cultivator to make the picker. In a few minutes I whipped together this apple picking contraption.


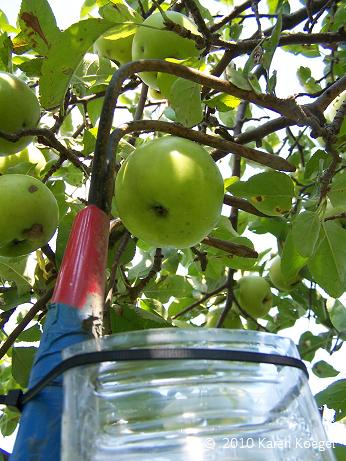
The idea I got from my apple picker investigations was that you would have something that would hook between the apple and the branch allowing you to pull down and break the stem.


Then your apples would fall and be caught by some kind of basket, in this case I used a juice jug that I cut the top off of and zip tied to the cultivator. I tested the apple picker on the ancient apple tree we have in the backyard and it worked well. Unfortunately after about half an hour of serious apple picking my picker started falling apart. Maybe it was the juice jug, or maybe it was the zip ties, but it just wasn't holding together. Oh well.


Regardless the apple picker helped me scour the upper branches of the tree to get a good five gallon buckets worth of apples. At her request, the most perfect looking apples were reserved for the local food pantry which she was going to drop off the fruit to in a couple days.


Immediately upon returning home the chopping began. My intention from the start was to try my hand at making applesauce. I've never made applesauce before, but from what everyone has told me its super easy.

With my paring knife in hand and following a recipe and some pointers from my mom, I quartered the apples- cutting out the cores and whatever insect/other damage I found. Then I cut smaller pieces into my largest stock pot. I cooked the apples for a little while until they started to become soft. Meanwhile I set up... my squeezo.


My squeezo. It may look complicated, but its really a simple and time saving tool. When I was a kid every August when the tomatoes were ready to make sauce out of, my job in the kitchen was to man the squeezo. It was so much fun!

Basically the tool allows you to separate juice and pulp from the skins and seeds of the food your processing. So in this case, I put the softened apples in the big funnel looking thing. By turning the hand crank and the food is fed through a spiral shaft surrounded by a screen that strains out the pulp and juice... which slides down into a waiting bowl, while into a second bowl the seeds and skins are deposited. I can only imagine how much time I saved in peeling the apples... I probably would have saved more by not coring them with my paring knife, but I was worried about worms (which I notice like to burrow from the bottom up through the center of the apple) and ended up just carving out that part for each apple.


The end result was so smooth and sweet. I didn't even add sugar. After passing through the squeezo the applesauce was done and ready for the canning jars!


Here are our 'orchard' in the making. These are four apple trees planted two years ago. Around here deer are very destructive and we knew we needed to devise a protective cage for all the saplings. I was explaining this to my neighbor who was having some problems with a sapling she planted, but which was getting abused by animals- so I promised to share our fencing method in this post.

First we secured stakes into the ground, here a U post on one side (something tall and strong) and a wooden one on the other. Using about 1/4" hardware cloth on the bottom extending upward about 24", the trees are protected from rabbits. On top of that is a heavier welded wire fencing which is about 48" tall. Both types of fencing were wrapped around and attached to the posts forming a protective cylander around the tree. Together the fencing stands about six feet tall. With mulch, weeds are not a problem and my boyfriend attached the fencing in such a way that allows flexibility for access to be gained for pruning or other maintinance.


At two years old the trees are looking mighty fine thanks to all of my boyfriends' hard work in caring for them. The time cannot come soon enough when one autumn day we can tromp out and pick our very own apple harvest from the backyard.

Friday, September 24, 2010

The September Mega Garden Profile


Here is the September garden. Autumn is knocking at Summer's door. From 90 degree weather just two weeks ago, we now are back to normal September weather. However, the cooler weather is just a reminder of how much more work there is to be done.

Despite being nearly autumn, the garden is in full swing. Some folks I have spoken to seem to be under the impression that once summer is over, so are gardens. "How's your garden? All put away?", "All done with the garden?", etc. This mega garden profile will show that the garden is far from done! There is plenty of plants laden with produce for the picking and the preserving.

One of the pretty gourds emerging from the chaos of vines.
 Gourds always have done well in my garden. I'm not sure what their deal is, but I won't complain. Last year when hardly any squash was able to grow, the gourd plants went crazy. Although I can't eat them, their mix of colors, textures and shapes are fun to have in decorating the house for Halloween and beyond (I actually JUST composted my last gourd from last year just the other week).

This is my first year growing pole beans. The pole beans have been awesome. Maybe too awesome. I planted them around the border of the fence thinking that it would give them something to climb on. They did just that. Now they are likely to pull the whole section of netting down with their weight! By some miracle the fence is still in one piece, though sagging, and I've been doing my best to keep up with the bean harvest. Of all the beans I grew this year, the pole beans were hands down the tastiest. Even when over mature, they still tasted  great. One other thing I observed is that they are a smoother bean. I am sure there is a botanical term for it, but beans can be... a little fuzzy, and its ok unless your eating a bunch raw (which I love- like eating healthy french fries). These pole beans seemed to lack that slight fuzziness, which makes me wonder if this is a quality present in only pole beans or maybe just this particular variety. Its something to ponder. 


Last year I managed to get ONE sunflower. Like so many of my other seedlings, the sunflowers were devoured by pests. This year I started seeds in trays on May 2nd. I left the seed trays right outside so that they got plenty of sunlight, the temperatures were not too cold and if there was a frost warning I'd cover the whole thing (this also kind of eliminates hardening off). By starting the seeds off in a tray I had the idea that I would give them all a head start from the slugs in the garden, who would otherwise chew them up at their first tender emergence from the soil. Well, it worked. All the seedlings that I transplanted survived. They were big enough to not be as bothered by the pests and once their growth took off it was no longer a concern. I don't do much with my sunflowers other than admire them. Typically I'm not big on growing flowers in the garden other than utilizing them as a companion plant (like marigolds) or to help break up all the visual mass of green.


Tomatoes! They are doing great great great. With the blight of last year, I took extra good care of the tomatoes this year. I kept them weeded, the soil cultivated, pruned and trained. Now I'm busy keeping them harvested, but its not easy to keep up with all the tomatoes being produced by my 12 plants. I've already canned enough salsa (but I'll do more) for a year, I've made chili (which I found is a convenient way to use up tomatoes) and have been eating tomato salads every other day. YUM!


Another success story is my parsley. I didn't get any last year thanks to pests. Again, I did the whole seed tray thing to start the plants off. When I transplanted my parsley in the tomato rows, I sowed more seed directly in the rows. Not a single seed survived into maturity- slugs ate them all. Only the transplants were able to handle the damage and eventually grew large enough that it didn't matter what the slugs did. I've got a good part of the parsley dried already (which I'll talk about more in another post) and still plenty more to go.


The same story is for the basil. Only the plants I started in seed trays and then transplanted out survived. Everything that I direct sowed out in the garden were devoured. Lesson learned! I'm going to just start these guys in seed trays from now on and will just forget about the direct sowing. I've already got a bunch of pesto in the freezer to be satisfied with for the rest of the year, but my plants are still going and I'll probably make more pesto and dry the rest.


Zinnia. One of the flowers I was talking about that I use to break up the 'green' of the garden. My current opinion of flowers is that they are second rate garden citizens. They take up room that vegetables could be growing in. This is a horrible attitude for some to read, I know, but as time goes on I'm sure it will change. They are pretty and its nice to cut some for the house too. I may allow more flowers in the future to grow with my vegetables. We'll see.


There are still lots of tomatillos ripening out there. The fruits have been maturing at a steady rate. I pick all that I am able to, preserve them, and then wait for the next harvest. They are not as overwhelming as tomatoes can be, that's for sure. The plants do grow very large though. This was something I read about- 'can grow up to 6 feet', but I didn't believe mine would. For the most part I was right, except for this one plant (pictured above) definitely grew taller than me and then its own weight made it bend over. Its a huge plant though. The other tomatillos grew about 3-4 feet on average. I've learned now that they are a sprawling type plant- not easily tamed with training. They are at home on the ground however. There were a couple plants I thought I lost after we had some wind a few times that snapped their stems. I was a little sad about it, but let them be because they still looked alive somehow. Eventually I realized that they have roots that grow out along their branches and then the plants just re-rooted themselves in this way. That's a nice adaptability feature.


Beans and more beans. I still have yellow beans out there. I canned some of them and may not get them all preserved. After eating the pole beans raw, the yellow beans taste like crap, so I will probably not be inclined to raw munchings of these guys. I grew a lot of beans this year compared to years before. One reason was that my boyfriend is crazy about dilly beans, I think he ate all the ones I made last year within a couple months. Secondly, beans are a legume and legumes are nitrogen fixing plants. In other words they have the ability to take nitrogen that's in the atmosphere and put it back into the soil via the happy relationship with the bacteria found in their roots. So in a sense I'm also growing beans to improve the soil and I happen to get some food out of the whole deal.


Cabbage family. I love the cabbage family. So so nutritious and cold hardy. Above is a bed of Brussels sprouts and red cabbage. They will be fine outside even after a frost. This is the farthest I've gotten with both plants. Again last year I had nothing to show for my efforts. I'm still learning.


Leeks. Nurtured since February (technically January 30th). No pests. No problems. They can also be left out in the garden practically forever. What I learned from last year is if I fail to pick them all by the time the ground freezes solid, I'll just have to wait until spring when they regenerate (some rotting may occur). 


Who needs flowers when you have gorgeous veggies like this kohlrabi? I never knew what it was until I was working my way through the recipes of a vegetarian cookbook on year and found this delicious recipe that used them. Now I grow kohlrabi every year. They are companions with beets, so I always pair them up with each other in a couple beds. Since they are a cabbage family member I don't have to worry about harvesting them for a good while yet as they will withstand the frosts in October.


Strawberries? Yes, I have strawberries in September. I am understanding more and more why people grow Alpine strawberries. They are incredibly hardy and while the berries are tiny, they have been producing berries all summer and now into the fall!


Green cabbage. It nearly was a failure due to the chunk (groundhog) wars earlier this summer. They made a come back and are looking ready to eat!


More cabbage family. Kale will be the happening green along with collards for awhile. Another vegetable that I can leave in the garden and eat well into November (and December?). Frost actually makes the greens taste better so I've been holding off a little bit for the frost to munch on them in full force.


Lastly pumpkins. I tried growing a jack-o-lantern type pumpkin, but the plant never did anything. So I am left with the tried and true pie pumpkin. I didn't get many, but each one is welcome gift from the garden.

This concludes the September Mega garden profile. I skipped last month, but I hope to have more to share in October. See you then!

Monday, August 30, 2010

Tales of Tomatoes


It's TIME. Time for TOMATOES! It is with great relief that this summer has provided the garden with (so far) a healthy group of tomato plants with a plentiful crop ripening on the way and getting ready to keep me too busy!

Roma tomatoes are the way I grow. Why? Better for canning. When it comes to canning, and other cooking recipes, this is the tomato for you. Think about how juicy tomatoes can be- a lot of water content! When cooking down tomatoes for sauces or even for use in a salsa all that water is not very desirable. With Roma tomatoes you get more 'meat' and less water than you do with other varieties.
2010

2009

After the tomato famine of 2009 I think there has been great expectations for a good harvest this year. While I have read of some late blight in other areas of the Northeast and even in New York it is nothing like last year. My garden and that of everyone I know of- has been blight free (so far). Compare the two tomato patch images above. The photos are taken nearly to the day a year apart! And what a difference! Last year at this day my tomato plants were DEAD! They slowly wasted away from the notorious late blight. It started with only one sick looking plant and in days the whole crop went from lush green growth to dead rotting plants. Needless to say 2010 is already looking very good.


It was interesting when I learned that the late blight spores cannot survive the winters of the north and that spores actually migrate from the south to the north through wind- every year. So why was 2009 so bad? Last years cool and moist climate just happened to be the perfect breeding ground for blight to spread like wildfire. This year in contrast has been very much the opposite- sunny and warm.

Sunshine is the enemy of fungi. So is circulation. If you keep that in mind it now makes sense why tomatoes are traditionally staked or supported in some way to hold the plants upright (as they will sprawl everywhere if you don't train them well). There are countless ways to stake tomatoes and its always fun to see some gardeners creativity or efficiency in doing so. I've used tomato cages, but I don't like them- too weak. My technique so far has evolved from wooden stakes to U posts driven into the soil when the transplants go into the ground. As the plant grows I do two things- train and prune. I use cotton twin to gently lasso the branches to the post. After I've trained the plant to grow in the direction I want it to (UP), I take that moment to prune off all the lower leaves, especially any leaf that touches the ground. Moving from plant to plant in this manner the process is repeated every week or so until necessary.

Training or staking keeps the plant under control and off the ground improving air circulation around it in the process. Pruning encourages the redirection of energy, but it also improves the air circulation even more around the base of the plant- which is a good battle plan against blight! Another benefit is that the tomatoes are easier to see and reach when the time to pick them has come. Other blight prevention strategies are to lightly cultivate the soil around the plants (airs out the soil), and to avoid getting the foliage wet when watering (water the ground, not the leaves).


One thing I wanted to try this year, now that there are tomatoes the play with, is sun dried tomatoes. I used a recipe for 'Oven-dried tomatoes' found in Put 'Em Up by Sherri Brooks Vinton. The tomatoes (again Roma is preferable) are cut in half lengthwise and tossed in an oil (olive seems best). The slices are to be arranged with the cut side up on cookie sheets and left to slow roast in the oven at 220 until they shrivel and start to burn singe a little. Store them in the freezer in clean freezer safe jars. I used one of my mason jars I had hanging around already in the kitchen.


And you have 'sun' dried tomatoes. They look pretty authentic! I'm wondering if there is any seasoning that could be used on the tomatoes. This can be something to experiment with. In the meantime, salsa is my next tomato project.


On a tangent, I'd like to say farewell to Angie Cat, our foster cat who returned home this past week. This was my last picture of her as she accompanied me while I harvested the tomatoes photographed for this post. Misses outdoors extraordinaire will be missed for sure, but she is enjoying her family reunion from what I hear. Good luck Angie!

Thursday, August 19, 2010

Eat what you can, can what you can't


 Salsa verde, beet greens, zucchini relish, pickled beets, raspberry vinegar, cucumber relish and pickles.

On inspecting a canning supply display at a local farm store, I saw a cute little saying on a small plaque which said: Eat what you can, can what you can't. That pretty much sums up the summer garden at this point in time. The pests seem to be under control (no more ground chunk battle stories) or the plants are so big it doesn't matter (slug wars are on hold). The weeding is less frenzied, I find that I am weeding to keep the rows looking nice and not necessarily to keep them alive. While I am still sowing seeds here and there occasionally for a fall crop, its not the mad rush of planting that was May and June. The main garden activity now is - preserving.

A harvest of beets minutes after being pulled from the ground and minutes before being pickled.

Growing your own food provides you with such a fulfilling sense of self sufficiency. Eating produce grown with care (as much as one can), without the use of harmful chemicals, picked at its peak and as fresh and as local as you can get- ah what a feeling it is!

Freshly picked tomatillos and Hungarian wax peppers, just before being turned into salsa verde.

While we are utilizing what is currently ready out in the garden to base entire meals out of... what about the rest of the harvest and the rest of the year? At this time of the year gardens everywhere are producing more than their caretakers can consume. Why leave that fulfilling sense of self sufficiency in feeding your family with the fruits of your labor for only a few short months of the year? That's where preserving techniques such as canning come to play. Eat what you can right now, and can what you can't - and eat it in ... for example... February. Eat from your garden year round by taking full advantage of preserving methods now while produce is in full harvest mode.

Changa showing off a milk crate full of cucumbers.
Something new I am trying this year is recording in my garden log the quantities of vegetables I harvest everyday. At the end of the season I will tally things up to get an idea of what the garden was able to produce this year and then eventually compare it to harvests of years to come. I'm also recording what I've been canning. How many jars of this or that and the size of the jars too. This will also be interesting information to have to compare to over time.

Lately I've been canning a lot. Which is my excuse for my less than frequent posts. In the last month I've canned:

6 -pints dilly beans
7- quarts pickled beets
2- quarts beet greens
3- quarts dilled pickles 
9 pints of dilled pickles
4- pints of zucchini relish
22- 1/2 pints of salsa verde
13- 4oz jars raspberry vinegar
25- 1/2 pints cucumber relish

Canned goods from just one month.

This is only the beginning too. The salsa verde- only used up a small fraction of the tomatillos that are growing out there. There are more bean plants growing (succession plantings) and more dilly beans to be canned as a result. The pickled beets only used up half of the beets that are out there. Not to mention the tomatoes (who *cross my fingers* are still disease-free and as happy as can be) that are JUST getting started. Tomatoes alone can consume a lot of canning energy!

Monday, August 9, 2010

Into the Cucumber Jungle


Enter the jungle. The cucumber jungle.

How many cucumber babies can you spot?

Tentacles or tendrils?

A strong grip.

A baby cucumber with its flower still attached.

A maybe too big cucumber.

The cucumber haul for the day.

This summer I am thankful for all the cucumbers that I have been able to enjoy from my own backyard. At nearly $2.00 each at the grocery store this seems to be a very economical vegetable to grow! At a steady pace we have been munching away everyday and still can't keep the numbers down. This is my first successful year growing cucumbers- and now I have cucumbers up to my ears!


Monday, August 2, 2010

The First Tomatoes of the Season


Celebrating... the first garden tomatoes of the year! (cue-fireworks)
My cherry tomato that has been growing in a container by the kitchen porch is starting to ripen its fruit. This is the first year I have tried container gardening seriously. Tomatoes are popular as a container plant. The choice of cherry tomato was because they seem to be more of an impulsive snacking plant... meaning the fruit is eaten in situ. Just like my peas this year (which I have hardly made any posts about, because they've all been eaten on the spot) have rarely made it out of the garden and even more rarely to the house.

One year at a community garden I grew a few cherry tomato plants. They were bountiful to be sure, but since I hardly visited the plot everyday, many of the cherries went neglected and uneaten (falling to rot on the ground even). When the fantastic and frantic rush of the tomato harvest is upon you, what will you spend your energy harvesting: 'regular' large tomatoes or tiny little cherries? In the end the bigger ones which served the most food value in canning were given the most harvesting attention and the cherries were left behind. Having a cherry tomato plant that is nearby the house, however, makes it easily accessible. One inconvenience is that with container plants you need to water them more regularly as they can dry out faster and with this hot summer it has been a challenge to keep all the plants content. It seems that the container cherry tomato has been a success thus far and considering the rate at which we have been snacking on the fruits, more plants are definitely in the plans for next years container garden.